How to localize ASP.NET websites
Lingobit Localizer is an ideal tool for ASP.NET localization. It allows you to translate all file types that are required for ASP.NET localization: HTML, ASP, XML and ResX files. The only thing you need to do is to prepare your website for localization.
How to prepare for ASP.NET localization
Localization support is embedded into ASP.NET technology. It allows you to extract all localizable resources from page into separate xml resource files (ResX) and translate them for all languages you want. Furthermore, ASP.NET automatically detect user culture and loads appropriate resource translation.
There are two types of resources:
- Global resource files are available to any page or component in your Web site.
- Local resource files are associated with a single Web page, user control, or master page, and contain the resources for only that page.

Creating Resources Manually
- Make sure that your Web site has a folder in which to store the resource file by doing one of the following:
- If you are creating a global resource file, you must have a folder named App_GlobalResources. To create the folder, in Solution Explorer, right-click the name of your Web site, click Add Folder, and then click App_GlobalResources Folder. There can only be one of these folders in an application, and it must be located at the root of the application.
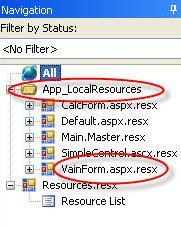
- If you are creating a local resource file, you must have a folder named App_LocalResources. To create the folder, in Solution Explorer, right-click the name of your Web site, click Add Folder, and then click App_LocalResources Folder. There can be many of these folders in an application, and they can be located at any level in the application.
- To create a resource file, right-click the App_GlobalResources or App_LocalResources folder, and then click Add New Item.
- In the Add New Item dialog box, under Visual Studio installed templates, click Assembly Resource File.
- In the Name box, type a name for the resource file and then click Add. Visual Web Developer opens the file in the Managed Resources Editor. The editor displays a grid where you can enter names (keys), values, and optional comments.
- Type key names and values for each resource that you need in your application, and then save the file.
Creating Resources From a Web Page
To generate a local resource file from an ASP.NET Web page

- Open the page for which you want to create a resource file.
- Switch to Design View.
-
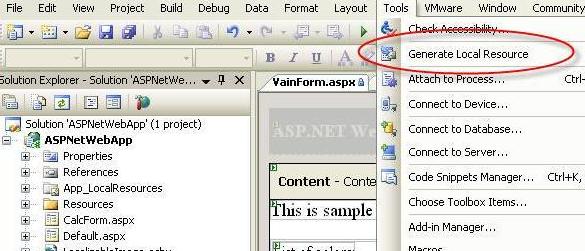
In the Tools menu, click Generate Local Resource.
Visual Web Developer creates the App_LocalResources folder if it does not already exist. Visual Web Developer then creates the culturally neutral base resource file for the current page, which includes a key/name pair for each control property or page property that requires localization. Finally, Visual Web Developer adds a meta attribute to each ASP.NET Web server control to configure the control to use implicit localization.

To generate a global resource file in Visual Web Developer
- In Solution Explorer, right-click the name of the Web site, click Add New Item, and then click Resource File. Visual Web Developer asks you if you want to place the file in the App_GlobalResources folder, and offers to create the folder.
- Click Yes.
- Type values for each resource that you need in your application, and then save the file.
Localizing Resources with Lingobit Localizer
It is very easy to localize your application after you created resources for web pages. Now all localizable information is concentrated in resource files. You just need to add App_GlobalResources and App_LocalResources folders into Lingobit Localizer project and start translation. It will automatically place localized files into appropriate location.

You can read about ResX localization at ResX localization page.
|


