|
How to extract C# hard-coded strings from source code to resources
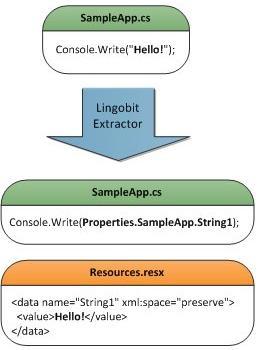
 Lingobit Extractor extracts hard-coded strings from C# source code to ResX resources. Original string is replaced with a code that loads it from resources. By default Lingobit Extractor uses strongly typed resources to access resources. For example Lingobit Extractor extracts hard-coded strings from C# source code to ResX resources. Original string is replaced with a code that loads it from resources. By default Lingobit Extractor uses strongly typed resources to access resources. For example
Console.Write("Hello!");
will be replaced with
Console.Write(Properties.MyApp.String1);
Strongly-typed resource wrappers are generated by Visual Studio. Therefore, after you extracted strings using Lingobit Extractor you need to open resources from Visual Studio and re-save them. It will force Visual Studio to generate strongly typed wrappers for new resources.
Working with ResX files
.NET applications usually use .ResX files to store resources. If you don't have such files in your project you can create it automatically using Visual Studio. Right-click the project, select Properties and go to Resources tab. It will ask you to create default resource file. You can also create new ResX file using Extractor and insert it into Visual Studio C# project.
When you are using default resource file strongly typed resources can be accessed using the following template:
Properties.$(RESNAME).$(ID)
when you added a new ResX file, you can access resources using
$(RESNAME).$(ID)
Step by step
Here are the steps to extract hardcoded strings from C# source code and prepare your application for localization
- Create Extractor project
- Add source code files into the project
- Create ResX resource file in C# project if you don't have it.
- Add ResX file as resource into Extractor project
- Review hard-coded string list and select which strings should be extracted. Use Properties.$(RESNAME).$(ID) replace template for default resource file, and $(RESNAME).$(ID) for other files.
- Save all files
- Open Visual Studio and re-save resources. It will force it to generate strongly typed resource wrappers for new strings.
|